•
A new contact model is proposed based on the interaction between two rough surfaces.
•
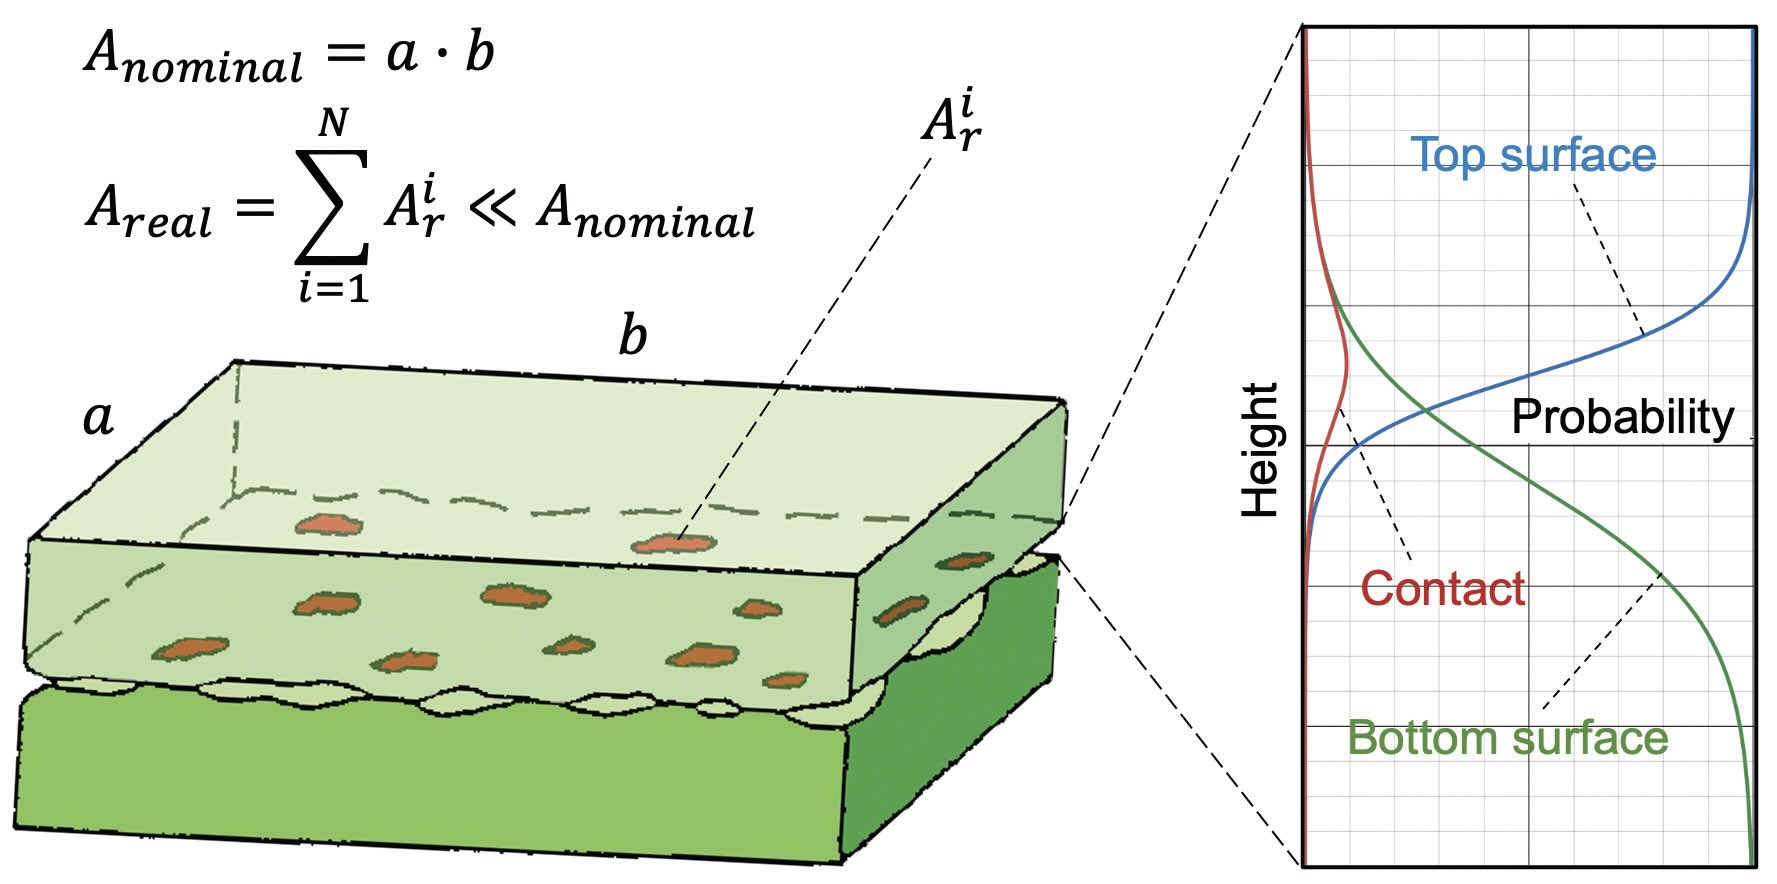
The probability of making contact between two faces is derived from the probabilities of encountering the top and bottom surfaces at specific heights.
•
Validation of the new model was made by experimentation which also predicted the effect of differences in roughness of the two contacting surfaces and estimating the height at which the contact is most likely to form.
Gaining an understanding of rough surface interactions is important in predicting such parameters as adhesion, friction, wear, leakage and electrical and thermal contact resistance. In a specific application, determining the real contact area and gap between two surfaces is a difficult task.
A past TLT article
1 discussed the challenges in characterizing surface roughness. This parameter can be assessed using different techniques but the question that arises is, which technique produces an output that is pertinent for a specific application? For example, a surface that is rougher using one scale may be smoother on a different size scale. The best approach is to evaluate surface roughness on multiple scales, use scale-dependent metrics and determine which scale is best based on the specific tribology problem in question. The challenge becomes even harder when two surfaces are involved.

Dr. Michael Varenberg with John Crane in Morton Grove, Ill., when working on the new contact model discussed here, and now with GE Aerospace in Niskayuna, N.Y., says, “Most models for predicting rough surface contact date back to the 1960s. They reduce two real surfaces to one equivalent and describe the interaction of this imaginary surface with an also imaginary and infinitely rigid counterface. The problem with these models is that the equivalent roughness assumption is fundamental and also quite big, so the prediction results are accurate to only an approximation. This becomes even more of a concern due to the uncertainties associated with related measurement and computing methodologies.”
Leakage is a particularly important parameter characterizing seal performances according to Varenberg. He says, “In a mechanical face seal, proper accounting for the roughness of both surfaces is critical to better understand what gaps are formed to cause leakage.”
Varenberg is now proposing a new contact model based on the interaction between two rough faces. He says, “We decided to take a step back from past efforts to model contact by working with two real surfaces. Each of the surfaces is described by its bearing ratio curve, which is a plot showing the percentage of material encountered as a surface is sliced at different depths compared to a perfectly flat surface. In this fashion, we are able to eliminate assumptions made in the past and focus on the basic statistics of how the contact is formed.”
The model devised by Varenberg is schematically presented in Figure 4. Varenberg says, “The top surface (transparent light green) and bottom surface (dark green) are shown in contact with each other (figure on the left). The contact area fraction Areal/Anominal or, in other words, the probability of making contact between two faces, is calculated by multiplying the two bearing ratio curves, which are the probabilities of encountering the top and bottom surfaces at each height (figure on the right).”
 Figure 4. A new contact model to explain surface interactions describes how a top surface (transparent light green) and a bottom surface (dark green) engage with each other (left figure). The graph on the right determines the probability of the two surfaces to be in contact with each other at a specific height. Figure courtesy of John Crane.
Experimental validation
The model proposed by Varenberg was validated through experimentation.
An experimental setup consisted of two flat ring samples with an outer diameter of 50 millimeters, which were brought into contact under a normal load applied through the center of the axial opening by hanging deadweights. Varenberg says, “The top ring sample made from polished sapphire was transparent in appearance while the bottom ring sample was prepared from resin-impregnated carbon reflected light.”
In this experiment, an optical light source was used to emit at spectral outputs between 200 and 1,000 nanometers through a 600 micron diameter optic fiber. The light was aimed at one of three contact posts that were situated on the reflective, bottom ring. Each of the polished contact posts was separated by 120 degrees so as not to interfere with each other.
Varenberg says, “The light beam entering the two flat ring samples is split at the bottom surface of the transparent material. Some light is reflected while the rest moves further and is reflected by the surface of the non-transparent material. These differently reflected parts of the original light beam are recollected by another optic fiber that is attached to a spectrometer which does the analysis.”
The two parts of the original light beam, having traveled different distances, interfere with each other optically leading to the formation of various visible colors. Analyzing their spectrum allows for determining the average gap between the surfaces as a function of applied load. The experimental data obtained this way served as a reference in comparing the currently proposed model with a traditional combined roughness approach.
Varenberg says, “The fraction of contact area predicted by the new model was found to be up to 10-15 times smaller than that estimated by the traditional combined roughness approach while matching experimental results significantly better. This result may help to explain current inaccuracies in modeling friction, leakage and electrical and thermal resistance. Two other benefits of the new model are that it can predict the effect of differences in roughness of the two contacting surfaces and it can also estimate the height at which the contact is most likely to form.”
Varenberg believes this new contact model can be further improved. He says, “Better accuracy can be achieved by accounting for surface deformation and by assessing roughness using three-dimensional profilometry.”
Varenberg is encouraging those in the tribology field to consider working with the new model as a means to help with better predicting surface interactions in specific applications. Additional information can be found in a recent paper
2 or by contacting Varenberg at
michael.varenberg@geaerospace.com.
REFERENCES
1.
McGuire, N. (2024), “Surface roughness measurements designed for performance prediction,” TLT,
80 (2), pp. 24-30. Available at
www.stle.org/files/TLTArchives/2024/02_February/Webinar.aspx.
2.
Varenberg, M. (2024), “Modeling contact of rough surfaces with bearing ratio curves,”
Tribology Letters, 72, 104.