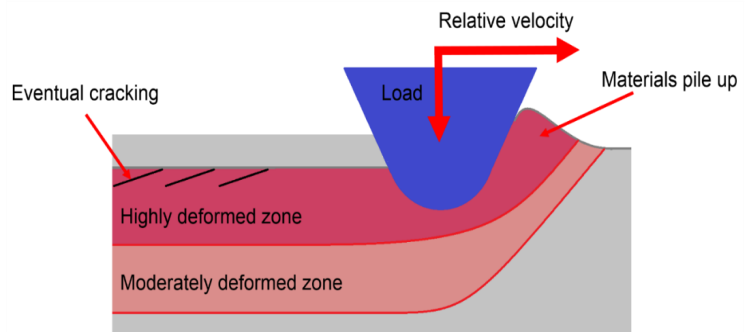
INTRODUCTION: Scratch testing is a fundamental abrasive wear test, simulating a hard particle abrading the surface1. The focus of this study is to understand ongoing wear processes at various stress levels and indenter radii. It may bridge the gap between macro and nanoscale scratch testing and its influence on the apparent coefficient of friction (COF) and wear mechanism in dependence of various factors. Therefore, data and a thorough discussion shall be provided on surface conditions and the resulting changes of wear mechanisms. A scheme of ongoing processes during scratching is presented in Figure 12.

Figure 1 – Scheme of deformation processes during scratching.
As seen, in the figure, the load, velocity, surface conditions and materials chemistry and state (mechanical properties) have influence on the materials response (deformation / cracking) and the apparent COF. A study of elastic and plastic proportions of deformation and their influence on the apparent COF shall be given; further statistical methods are applied to correlate all relevant parameter.
MATERIALS AND METHODS: Prior to the experiments, metallographic samples of an austenitic steel (1.4571) were prepared. To ensure a constant microstructure and certain roughness, samples surface was grinded, fine grinded, polished with a 1 µm diamond dispersion and finish polished with a neutral, colloidal oxide dispersion (0.2 µm). The surface roughness, depth and appearance of performed scratches were measured utilising a Leica® confocal microscope. To evaluate governing stresses, a calibration curve for each indenter was calculated via indentation depth at certain loads. Load-stress curves were then calculated and enabled the selection of constant stresses and the correlation of different COF and the changes of wear mechanisms at chosen contact stresses; calculated according to Fisher-Cripps 3.
Scratch tests were performed with diamond indenters at various stresses at two different devices: A Hysitron® Triboindenter T900 with indenter radii 0.652 µm and 100 µm was used for nano scratch, a modified TriboTech® scratch tester and 10, 50 and 200 µm radii were utilised for the macro scratch tests.
For a thorough analysis, scanning electron microscopic images were taken with a Zeiss® Gemini Supra 40 VP SEM, to reveal surficial changes and wear mechanisms in dependence of load (stresses) and indenter geometry.
RESULTS: As given in Figure 2, two loads were chosen for evaluation to show the influence of the indenter radii at constant loads. At macroscopical scratching, higher indentation depth leads to higher deformation and therefore to a higher COF. The influence of the ratio of elastic and plastic deformation shall be discussed at constant stresses, and will be published in the full-version publication of this study and will be further performed for the nano scratches as well.